Author photograph
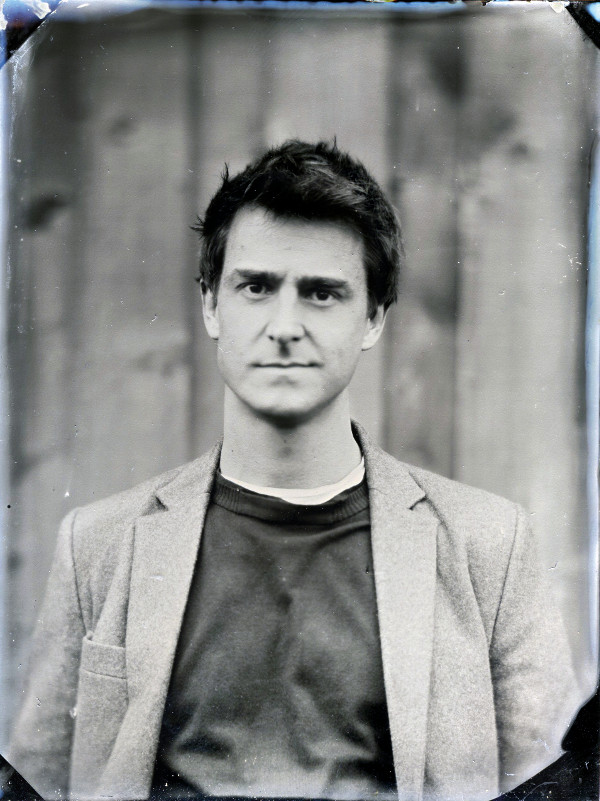 One of the things I tried hard to ensure whilst researching and writing the book was that I got first-hand experience in many of the processes and skills I talk about, and this includes the author photograph.
I wanted to take a selfie in the deepest sense you could ever take a selfie — by creating a photograph from scratch.
Chapter 11 of The Knowledge describes several aspects of more advanced chemistry, such as the astounding silver chemistry that enables you to capture light itself and so open the door to photography. The mugshot (right) included on the inside flap of the hardback book jacket was created using a primitive single-lens camera and this rudimentary silver chemistry, resurrecting techniques that date right back to the 1850s and the earliest years of photography.
Richard Jones helped enormously with this process. He’s the curator at the Fox Talbot Museum, in Lacock Abbey, Wiltshire, where the first photographic negative was created in 1835.
There are a few interesting things to note with this rudimentary photograph. Firstly, the primitive silver chemistry we used is very slow to react to light – it is hugely less photosensitive than modern ISO 400 films – and so correspondingly long exposures are needed. The image here is a 16 second exposure (hardly a snapshot!) and the slightest, imperceptible movement during that time results in a horribly blurred photo. To help solve this, hidden conveniently out of sight behind me is a wrought-iron stand and skull brace for holding my head perfectly stationary.
Such long exposures also mean that it is exceedingly hard to smile naturally, and hold the expression perfectly still for a good fraction of a minute without it looking like a rigour mortis snarl. This goes a long way to explaining the ridiculously-stern look common in early Victorian portraits of gentlemen and ladies. Believe it or not, this photo here is the most relaxed and natural-looking one we captured in a whole day of trying.
Also, the simple photochemical system used here is more sensitive to ultraviolet light than visible, as UV rays deliver more energy to drive the silver conversion reactions. This means that these photographs aren’t quite recording the world as the human eye sees it. As you can see, primitive photos make the lips look unusually pale (because they reflect more UV) and the skin appears more textured and blotchy in the UV.
Two main methods were used in the early days of photography. You could spread your silver halide photosensitive emulsion onto a metal plate coated with black lacquer (bitumen dissolved in mineral spirits), called Japaned steel. Exposed regions of the plate become pale with the grains of metallic silver whereas unexposed regions remain dark with the bitumen background. This method therefore directly produces a positive image, known as a ferrotype, without further processing – almost like a very early polaroid. Alternatively, you could coat your photoemulsion onto a clean piece of glass, to produce a negative plate after exposure and developing. Although you can’t immediately see your image, this is in fact far more versatile as you can create countless paper prints from this one negative, as well as take advantage of techniques like enlargement.
The basic recipes for the photographic chemistry we used are as follows.
Preparing the photo emulsion (for either blackened metal or glass plates):
- Mix up collodion so that it is still fairly fresh before your photographic session: nitrocellulose dissolved in ethanol and ether. Nitrocellulose can be made by reacting paper or cotton with nitric acid. Ethanol is distilled from a fermentation batch and ether can be prepared by reacting ethanol with a strong acid, such as sulphuric acid (found in drain cleaner and car batteries), and then distilling to purify.
- The collodion is then laced with halide salts – potassium iodide and potassium bromide. Both iodide and bromide salts are used as this increases the range of wavelengths of light that the photoemulsion will be responsive to (it extends the spectral coverage).
- Carefully pour the collodion evenly across the front face of the photographic plate.
- Wait for the collodion to gel, as the solvents evaporate away, but not to set completely
- Bathe the photographic plate in a tank of silver nitrate (~8% solution in distilled water), which can be made by dissolving silver metal in nitric acid. The silver nitrate reacts with the potassium halide salts in the collodion gel to produce silver iodide and silver bromide. These are the crucial light-sensitive compounds, and so this step must be done in a dark room. You now have a photosensitive plate ready for capturing an image.
- Place the photosensitive plate in a sealed cassette and transfer it into the back of the camera without exposing to light.
- Take your timed photographic exposure
Development and fixing:
- Back in the dark room, remove the exposed plate from the cassette and pour over your developer solution. This is a mixture of ferrous sulphate, pure acetic acid and ethanol. The ferrous sulphate (made by dissolving iron in sulphuric acid) is the developer chemical, and acts to complete the reduction of exposed silver halide grains to pure silver metal. The acetic acid serves as a restrainer, preventing unexposed areas from also spontaneously developing, which would lead to fogging of the image. The ethanol is used as a flowing agent to help the mixture evenly cover the surface of the exposed plate.
Exposed plates coming out of the developer bath - Rinse off the developer with water.
- Fix the developed image with ammonium thiosulphate to stop any further silver reactions, making your image stable in light. Sodium thiosulphate can also be used, but does not act as quickly. Thioshulphate (traditionally called hyposulphite) can be made by bubbling sulphur dioxide gas through a solution of soda or caustic soda and then boiling with powdered sulphur.
- Rinse in water again, and allow to dry.
- Coat the finished photographic plate (either ferrotype or glass negative) in transparent varnish to protect it from scratches and scrapes. Gum sandarac (a tree resin) dissolved in ethanol and with lavender oil (for improved flexibility) works well.