How to build a house: rising from the ashes
Guest post by architectural designer Sam Davey (@SNDavey; website). All illustrations © Sam Davey.
Shelter. It’s one of the most fundamental of needs but immediately after the Fall permanent habitation it is likely to be the last thing on your mind. You may be one of those displaced by the crisis of civilisation, or reacting to more violent parts of the population, scavenging for food or simply looking for a source of uncontaminated water. In any case, in the immediate aftermath it is very likely that most nights not spent under the stars will be spent under a roof built before the collapse.
These buildings, though, will not last forever and the time will come when a post-apocalyptic community is going to need to know how to construct permanent shelter for itself. Here’s how to build a house.
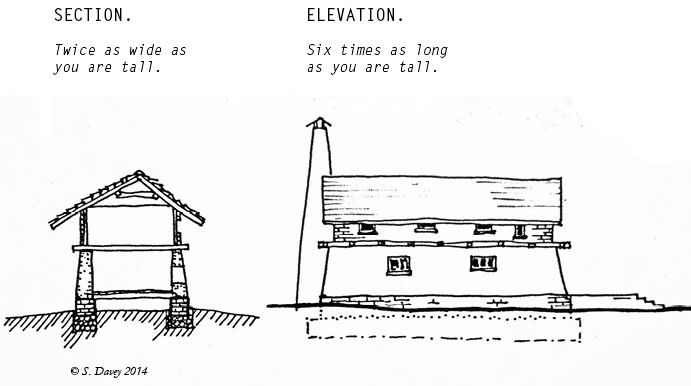
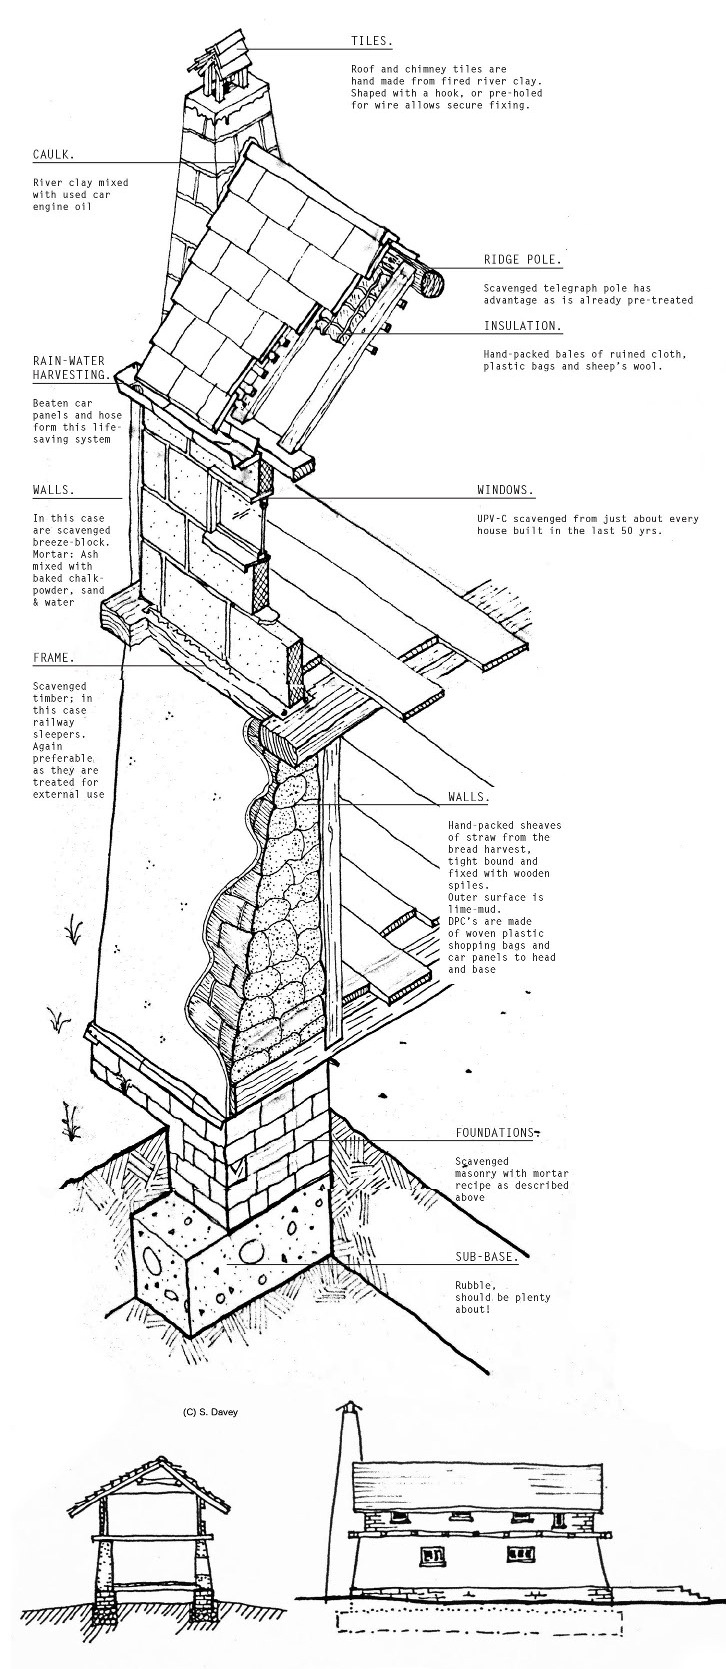
Longhouses (see above) use a simple structure that still allows two stories, so we’ll focus on their construction. A good, stable proportion for a longhouse is a rectangle three times longer than it is wide – so at a minimum size a house with a width twice as tall as you are and six times longer.
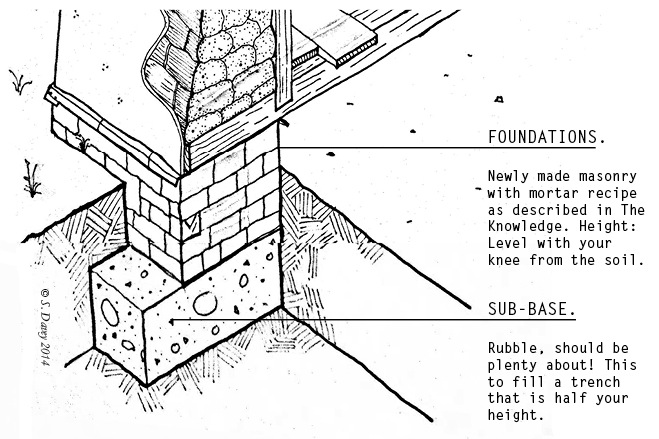
Let’s start from the ground up. Assuming you’re building on fertile land for agriculture the ground will be soft. To stop your building sinking, cracking and eventually failing, some sub-level support is a necessity. You will need to dig trenches and these need to be half as deep as you are tall. They follow the perimeter of the planned building and will be the only place your structure touches the ground. Into this trench a sub-base of rubble (the origin of the phrase ‘hard core’) and other non-organic waste must be thrown, filling it to three-quarters. This gives you a solid inert base on which to lay your foundations.
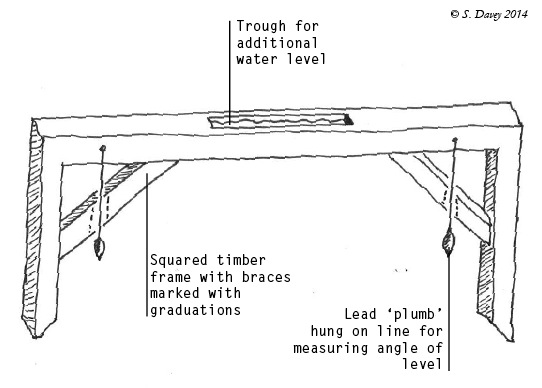 The first layer of your building must be roughly level and stable. You may use your eye but a Roman ‘chorobates’ of two plumb lines suspended from a square frame will aid you (see right). From here up the work should continue with care. A number of courses of fired brick or stone now need to be laid. These can be ‘dry’ and without mortar so long as they are ‘cut’ to be self supporting. Stone can be split with wooden pegs driven into holes and then swollen with water, but cutting stone is laborious even if tools are available. However, as The Knowledge explains, firing clay for bricks and making basic cement should be readily achievable.
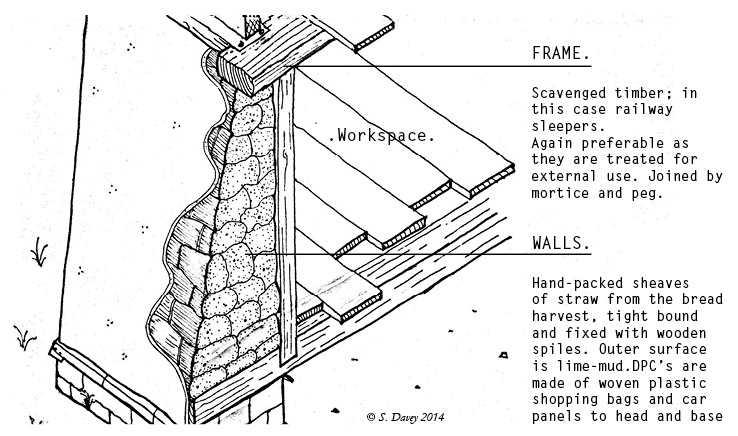
This foundation wall should continue up from the sub-base to knee-height above the ground. This level will stop splashing rain damaging the main wall, but a ‘damp-proof-course’ (DPC) will be needed to stop water soaking higher up. The Victorians employed a layer of slate, and today we use thick plastic membranes. A compromise in a post-apocalyptic world might include flattened car panels and scavenged plastic bags. So long as there is a continuous, compressible barrier the system will work well enough (see below).
The next level is the suspended floor. Your foundations have lifted your structure away from the wet ground and we have a flat dry platform on which to live. Timber is strong, light and easy to work, but it does suffer from rot and of course is flammable so many sources may already have been consumed for fuel. Scavenge or fell timber to run some horizontal beams between our foundation walls. Across these we can lay boards. Woodworking and steel tempering are covered in The Knowledge, and again we assume you are able to notch timbers and so can erect from the horizontal frame some vertical members. The spacing should not be greater than the reach of both of your arms outstretched.
Before we load this next storey we need to give it lateral support. Bunches of straw or reed are employed to pack the space between the frame (see below). These must be very dry and tied as tightly as possible. Once in place these can be further strengthened with poles driven vertically into the bundles. The bundles should be stacked beyond the top of your frame as these need to be compressed and will be squashed. The upright posts now have a mass against which they can be anchored. With these two mutually supporting parts in place it’s time to sling the next horizontal members across the ceiling of your building. Again these can be notched, or drilled and pegged, or even bound with hemp rope. Between these, running along the top of the bundle must be secured a ‘wall-plate.’ This timber member ties the frame together and ensures it bears onto the bundles.
Another water-proof layer rests atop of this frame: all framework should be shielded from standing water so here again we can employ a ‘flashing’. This can be sloping sheets of beaten car panels that ensure rain water runs straight off. Any remaining exposed timber should be treated. Naturally occurring tar, or if available, used car engine oil, can be periodically painted onto the timber.
Above this more timber framework is used for walls, with a timber roof frame above that (see below). Water is the great destroyer; in the temperate latitudes precipitation is a constant presence. In the tropics sudden downpours and high humidity are equally threatening. Once it has found a way in – and it will! – rot and decay will follow, even in brick and cement. Seeds will germinate and slowly nature will reclaim what we merely borrowed for a while. A little ingenuity though will help; if you can fire bricks you can also make your own interlocking tiles, and the design for these can be copied from existing ones. Also, don’t forget that thatch from straw or reeds, and split slate have been used successfully as roofs for thousands of years. Thatch is light and requires a thinner frame but requires replacing periodically and may not withstand extreme weather events as successfully as a heavier system.
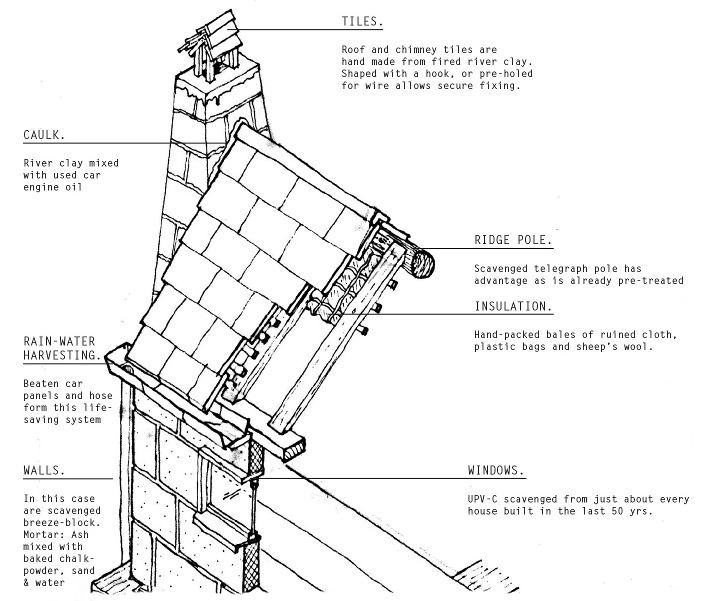
Finally we must ensure water and air tightness. If existing PVC framed windows and glass cannot be scavenged, then employ shutters in your window openings. Our horizontally layered straw walls will rot very fast if they are not first waterproofed. A simple wattle of mixed mud, chaff, and clay or cattle excrement can be applied. If abundant enough, mixing with a crumbled brick or fly ash (from your furnaces) will create a much harder, more water-proof render which won’t need recoating as often. A similar plaster can be used to coat the internal walls, once you’ve insulated them. Any other gaps or borders can be filled with caulks of oil- or fat-saturated rope and rags, or clay mixed with oil. Bales of insulation made of wool, ruined clothes and shopping bags would help keep warm air in.
Such a longhouse building will last you years in comfort and security and is easy to erect using only basic skills, tools and a kiln. Many of the principles used in construction of even today’s buildings have not advanced very far from those the Romans employed. This longhouse construction described here does not employ more complex principles such as the use of rammed earth walls for thermal mass; the stack effect for ventilation or thermal breaks between in and out – you will rediscover these aspects with time.